Homemade Prawn Sushi

We love sushi. I tried my hand at making it a few years ago. It was nice but just not quite right and it just looked a bit messy and unimpressive. So I never really felt the urge to try again.

However, a couple of weeks ago I decided to go for it again. I bought the sushi-making ingredients and thought I would have another go. The results both tasted and looked amazing. If you like sushi you should give this a go; it is easy and very tasty.

This recipe is for king prawn maki sushi and king prawn nigiri sushi. There are, of course, limitless fillings for your sushi. Just have fun with it and introduce your favourite flavours. This makes eight maki sushi and four nigiri sushi. This is a generous meal for one or a light lunch for two.

Sushi is also lovely and healthy. It is quite low calorie too. This whole recipe has about 700 calories so only 350 if shared between two for a light lunch. That is around 60 calories a piece.

Ingredients

125g sushi rice
165ml water
1.5 tablespoons rice wine vinegar
1 tablespoon sugar
0.5 teaspoon salt
12 king prawns (we used pre-cooked frozen king prawns)
Mayonnaise
Sweet chilli sauce
1 sheet sushi nori (dried seaweed)
Soy sauce, wassbi paste and sushi ginger to serve

Method

I am sure it is very much a cliche to say that sushi is all about the rice. But it is true; if the rice is not right then the sushi will not be right. However, it is fortunately very easy to get right (it has at least worked every time so far for me).

Firstly place your rice in a bowl and cover with water and swirl around to “wash” it and the use a seive to pour off the water. Repeat this another three times; you should see the water getting progressively less cloudy each time.

Now place the rice in a small saucepan along with the water. Bring this to the boil and simmer covered for ten minutes over a lowish heat. I give it an occasional shake to make sure the rice does not stick.

Once the ten minutes is up take the rice off the heat and leave it covered for at least 25 minutes. 

Whilst the rice is cooling you should defrost your prawns (if using frozen) and prepare your rice seasoning. Mix the vinegar, sugar and salt together in a small cup or jug and leave to stand until the rice is ready.

Once the rice has cooked thoroughly mix in the seasoning mixture.

Now you can start to construct your sushi. Firstly prepare your prawns. Cut eight of them up into chunks for the maki sushi and butterfly the other four for the nigiri sushi. To do this (and I warn you that I am no expert at this😃) have the “back” of the prawn on the chopping board and then cut all the way through the prawn at either end whilst only cutting about two thirds of the way through the central section.

Now let’s start with the maki sushi. Now I don’t have any sushi making kit so I use a tea towel. Place the sheet of sushi nori on the tea towel.

Now spread rice over the sushi nori. It should be quite thin at about a quarter of an inch and should be as even as possible right to the edges of the sheet of seaweed whilst leaving about half an inch uncovered along the edge nearest to you and about one inch uncovered along the edge furthest away from you.

Now place the pieces of king prawn tightly together in a line on the rice about one third of the way up the rice.

Now place a line each of mayonnaise and sweet chilli sauce on top of the king prawns. I then sprinkled on salt and pepper too.

Now use the tea towel to roll the seaweed sheet up as tightly as possible, taking care to not let any filling escape the sides. 

Just before it is fully rolled wet the uncovered section of seaweed (this will act as the glue to stick the roll together).

Leave the maki sushi to stand for a while.

Now make the nigiri sushi. Another weapon in my makeshift sushi making armoury is cling film. Place a sheet folded over on your surface and place the remainder of your rice on it.

Then form the rice as best you can into a long rectangular shape that is as firmly packed as possible.

Unwrap and cut the rice into four chunks. Place a butterflied king prawn on top of each piece and that is your nigiri sushi done. Easy👍

Now, using a very sharp knife (it really does need to be sharp otherwise you will squash rather than slice your maki sushi) slice the maki sushi into eight slices. If your knife is sharp enough then you should not need to put much pressure on the knife. You should be able to use a sawing motion and let the weight of the knife push through the roll.

And now you have some really quite professional looking king prawn maki sushi. Absolutely beautiful.

This really is a lovely meal. I drizzle soy sauce, spread a tiny bit of wasabi paste and place a little piece of sushi ginger on each piece. Not exactly traditional but it works for me😃

My wife leaves off the wasabi; it is firey stuff.

I am not going to do suggestions for altering this recipe. There are way too many. I will post them as I make them.

Enjoy😃

Amazing Oxtail Stew – Rich, Satisfying and Surprisingly Low Calorie

I love oxtail. It is such a tasty cut of beef. For me it is the perfect meat for a stew. It needs to be slow cooked but it is worth the wait.

This oxtail stew tastes lovely and dirty; I mean, what do you expect from such a fatty cut of meat that you cook on the bone for a long time? What you don’t expect is that this is actually low calorie. What???? You’re kidding me!!! A rich, satisfying, dirty bowl of oxtail stew; low calorie? No way! IT’S TRUE. The way I cooked it there was only 450 calories per portion. UNBELIEVABLE😱

You have to try this stew. If you like beef you will not be disappointed.

I used a slow cooker but you could just cook on a hob, in the oven or in a pressure cooker. See the notes at the end for suggestions about how to use these different methods.

Ingredients

1.2kg oxtail (on the bone)
1 tablespoon oil (I used rapeseed / canola oil)
2 large carrots
2 onions
150g mushrooms (use your favourites)
2 thick rashers smoked back bacon
2 teaspoons Worcestershire sauce
2 bay leaves
1 litre beef stock (I used four oxo cubes and 1 litre boiling water)
1 teaspoon salt
3 tablespoons flour
2 heaped teaspoons of ready made English mustard
Ground black pepper to taste

Method

The key to any great stew is to make sure you get depth of flavour. This starts with the beautiful oxtail. Rub the pieces of oxtail with the oil and roast at about 180 degC for 20 to 30 minutes until lovely and browned.

Meanwhile prepare the veg. Peel and roughly chop the carrots and onions. Roughly chop the mushroom. Throw the veg in the slow cooker with the bay leaves.

Now for the next layer of flavour. The smoked bacon adds an unbelievable smoky depth to the final stew. Chop the bacon and chuck it in with the veg. Then pour in the Worcestershire sauce, stock and salt. Mix the whole lot together.

Now add in the oxtail and any roasting juices (yet more flavour). Slow cook for a long time. I cooked for about seven hours. About half and half at high and low temperatures.

When cooked the meat will just fall off the bone when gently prodded. At this stage there will be quite a deep layer of fat on top of the stew. It is now that the serious calorie reduction takes place. Remove the meat from the stew. 

When cool enough to handle remove the meat from the bone. Break the meat up to your liking. You should discard any large pieces of fat. You should be left with just meat. 

My internet research suggests that the meat yielded from cooked oxtail contains about 200 calories per 100g. My 1.2kg of oxtail yielded a little over 400g. So 800 calories which became about 1800 calories with the rest of my ingredients. As this recipe makes four generous portions that makes just 450 calories per portion….AMAZING👍

Now you need to remove the lake of fat from the top of the stew. Personally I use a spoon to remove it initially. Be careful to not spoon out the stock. Spoon the fat out into a bowl. Once you start spooning out a higher proportion of stock than fat then move to the next fat removal stage.

Now this may sound a bit weird but it works an absolute treat. Soak up the fat with kitchen roll. It really works. If there is fat there the kitchen roll soaks up this and does not soak up the stock. You will need several sheets; as soon as a sheet is saturated with fat throw it away and use another until all of the floating fat is gone (at this stage the kitchen roll will start to soak up stock).

Now we have severely reduced the calories you should throw the meat back into stew and stir to mix. Breaking up the meat really makes it feel like you are eating a lot more meat than you actually are as every mouthful has some lovely, flavoursome, slow cooked oxtail in it.

Now for the final layer of flavour. Make a sort of roux with a couple of tablespoons of the removed fat, the flour and the mustard. Put it in a pan and cook gently for a few minutes whilst stirring to ensure it is fully mixed. 

Now sieve in a little of the stew stock, whisking all the time. Once the liquid is fully mixed then add more of the stock, whisking all the time. Continue another couple of times until all of the stock is in the pan. Continue whisking until the mixture comes to the boil and allow it to simmer for a few minutes. Add pepper to taste. You should not need any salt but now is the time to add it if you wish. The stock should be a lovely, thick, rich, tasty sauce now.

Pour it back into the slow cooker and stir everything up. That’s it! An amazing, low calorie oxtail stew that just tastes so rich and satisfying that you will not be able to believe that it is not dirty.

I still have difficulty believing that I can consider eating this on one of my low days.

If you are on a low day enjoy this stunning stew on its own or with cauliflower cous cous. Alternatively, it is great with mashed potato or chips. Or even bread to dip in.

Try this stew. You will not regret it.

Suggestions for modifying this recipe

  • There are a few suggestions discussed above; e.g. Use your favourite mushrooms or accompaniments.
  • Change the type of mustard or even use horseradish sauce.
  • Add different veg and different quantities of veg.
  • Thicken the stock with red split lentils rather than the “roux”. They will need to cook in the stock for about 25 minutes and then be blitzed. Between 100g and 200g depending on how thick you want the stew.

Different Cooking Methods

Now please bear in mind that I have not actually tried using a different cooking method but the following should provide a useful guide.

  • Pressure cooker. Rather than slow cooking cook at high pressure in a pressure cooker for about an hour. Everything else is the same.
  • Oven. Rather than slow cooking cook at about 160 degC in the oven for three or four hours; until the meat falls off the bone when gentle pressure is applied.
  • Hob. Rather than Pressure cooking simmer on the hob at the lowest possible level until the meat falls off the bone when gentle pressure is applied. I guess about three hours. You will need to stir regularly to avoid burning.

Enjoy😃

Beautiful halogen oven roast lamb with veg and gravy

I absolutely adore roast lamb but I have rarely managed to cook it successfully. So after a bit of Internet research and following the success of my halogen oven roast pork I decided to have a go at roasting a joint of rolled lamb in my halogen. 

Oh my God! The result was absolutely beautiful. You need to try this. It is not especially low calorie (although the veg is and you can always choose how much lamb to eat – although it is so nice you will want a big pile of it😃).

I even had a go at some home made gravy and that was lovely too.

Ingredients

A rolled lamb joint (mine was about 1kg this feeds four people generously)
Garlic puree
1 teaspoon of chopped fresh rosemary 
Salt and Pepper
Potatoes (quantity depends on how hungry you are)
Carrots (again, up to you how much you have)
1 tablespoon oil (I use rapeseed / canola)
Frozen petite pois (you decide how many you fancy)
2 tablespoon butter
2 tablespoon flour
600 ml beef stock
4 teaspoons ready made mint sauce 

Method

Let’s start with the lamb. Leave it out to get to room temperature.

Pre heat the halogen oven to 190degC.

Cut across the lamb on one side (the side with the fat on if there is one). The cuts should be about 1 cm deep and about 2 cm apart. 

Now you need to add extra flavour to the lamb in order to give the final roast meat that little something special.

Rub in the garlic puree (I used about three cloves worth), chopped rosemary leaves and salt and pepper into the cut side of the lamb, making sure to rub it into the cuts.

Once the oven is up to temperature place the lamb in on a low rack with the cut side up. Cook for 20 minutes. Then turn the joint upside down and cook for another 20 minutes. Finally turn it back over and cook for a final 15 minutes. Adjust this final cooking until it is done to your liking (I cooked it until the internal temperature of the meat was 55 degC – I used this website as a guide).

Now take the lid off the halogen oven and cover with a tea towel or something similar and leave to rest whilst the veg cooks. This resting is vital to allow the meat fibres to relax to make the meat super succulent.

Now for the veg. Prep the veg whilst the lamb is cooking. Peel, chop, wash and dry (in that order) the potatoes and carrots. Place in an Actifry or similar and mix with the oil. Place the petite pois in a microwaveable bowl.

Once the lamb has finished cooking and started resting switch on the Actifry for 25 minutes.

Towards the end of veg cooking time make a roux by gently cooking the butter and flour in a small pan whilst constantly stirring for a couple of minutes. Gradually whisk in the stock and keep whisking gently until it begins to simmer (it should have thickened up by then). Stir in the mint sauce.

Microwave the petite pois for a couple of minutes until hot.

Now carve and serve and all there is left to do is to eat😃

A beautiful roast lamb dinner. Yum😃

Suggestions for modifying this recipe

  • Try it with your preferred veg. I do think that slightly sweet veg works well with lamb.
  • Try different rubs on the lamb. Maybe use mint instead of rosemary. Maybe add your favourite mustard.

Beautiful, super-healthy vegan chilli

I love a beautiful bowl of chilli. It is really tasty and satisfying. However, traditional meat based versions carry too many calories for my low calorie days so I decided to create a new chilli that I can enjoy on those days.

By happy coincidence the resulting beautiful, tasty, super-healthy, low calorie chilli also turned out to be vegan.

Now I am no vegan (check out my other recipes) but I embrace all types of food and I find that really tasty vegan and vegetarian food can help when trying to control calories.

This chilli has lots of things in it that are good for you. It probably has about three and a half of your five pieces of fruit and veg per day in every portion (although don’t quote me on that – I am no nutritionist😃).

This recipe makes enough for eight generous portions that each contain approximately 275 calories.

Simply serve the chilli on its own or with whatever accompaniment you usually have with chilli. Some suggestions are:

  • Boiled or steamed rice.
  • Nachos.
  • Baked potato.
  • Blitz cauliflower and roast for ten minutes to make cauliflower “rice”.
  • A dollop of sour cream.

If you are trying to keep calories low then either eat the chilli on its own or with cauliflower rice (or a small amount of boiled or steamed rice).

Ingredients
2 teaspoons oil (I used rapeseed / canola)
2 large onions
3 medium carrots
2 sticks of celery
Garlic puree (about 3 cloves)
2 tablespoons tomato puree
2 x 400 g tins of chopped tomatoes
1 tablespoon hot chilli powder
1 tablespoon mild chilli powder
1 tablespoon smoked paprika
1 teaspoon ground cumin
1 teaspoon cayenne pepper
1 teaspoon hot curry powder
1 teaspoon dried oregano
1/2 teaspoon dried thyme
500 g dried green lentils (I used green speckled lentils)
1 1/2 litres vegetable stock
Salt

Method

Roughly chop the onions and carrots (I like to leave the carrot pieces quite large to give the finished chilli a bit of extra texture) and chop the celery slightly finer.


Heat the oil in a large pan and then fry the onion, carrot and celery over a moderately high heat for five minutes, stirring frequently until the onions are soft and taking on some colour.

Then stir in the garlic and tomato puree and heat through before adding the chopped tomatoes and all of the spices and herbs. I find it easiest to get all of the herbs and spices measured out into a little cup whilst the veg is frying so I can simply throw them all in the pan in in one go. Stir the pan so that the herbs and spices are thoroughly mixed in with the tomatoes and veg.


Add the lentils to the pan and stir to mix.


Add the stock to the pan, stir to mix and bring to the boil. Now simply simmer gently for a couple of hours, stirring every now and then.


The long slow cooking really lets the flavour mature. If the chilli gets a bit too dry (or if all the liquid is absorbed before the lentils are cooked) then add a little more water. Add salt to taste.

Once cooked I turn off the heat and just leave the pan sitting there for several hours (I actually left it for about 11 hours overnight). This allows the chilli to cool down but, more importantly, it lets the flavour mature further, especially the lovely smokiness from the paprika. However, if you are worried about leaving food out for so long you can simply refrigerate or freeze as soon as the chilli is cool.


That’s it!” Simple! Now you have a beautiful, super-healthy, vegan, low calorie bowl of chilli. Yum😃

You can eat straight away but I think chilli is like all stews and the flavour gets better if you can bear to leave it to mature for a day.

This chilli freezes well. Just portion it out before freezing and then defrost and heat up in a microwave when you want to eat a portion.

Suggestions for modifying this recipe

  • Change the level of heat by varying the amount of spices, particularly the chilli powders.
  • Use your favourite types of chilli (e.g. Chipotle)
  • Try adding your favourite beans to the chilli. If dried just make sure they are rehydrated first.

Super-Healthy, Super-Easy Cauliflower-Base Pizza

Cauliflower is amazing. When I was growing up it was the veg of dread. We typically got over-boiled cauliflower that was pretty tasteless. Occasionally we got cauliflower cheese, which is lovely (see my halogen oven roast pork post for a dead easy recipe). So imagine my surprise when I hear that cauliflower is becoming trendy; when people are talking about cauliflower couscous, cauliflower rice and even cauliflower pizza.

I was certainly sceptical but I was very wrong. Cauliflower can be an amazing low calorie, super-healthy substitute for couscous, rice and, most surprisingly of all, pizza base. You have to give it a try, it is awesome.

This pizza recipe serves two people and is perfect for a low calorie day as each serving was only 300 calories.

And don’t worry if you are not a cauliflower fan; keep the base nice and thin it and the pizza will not actually taste of cauliflower.

Right, first the ingredients:


For the base
1 cauliflower, stripped of its leaves
1 large egg

For the sauce
400g tin if chopped tomatoes
Small handful of basil leaves chopped 
10 small green pitted olives chopped 
4 sundried tomatoes (most of the oil scraped off) chopped
A couple of cloves of garlic (or cheat and use a squirt of garlic puree like I did)
Ground black pepper

For the topping
125g ball of light mozzarella cubed
Small handful of basil leaves chopped

Now for the method:

I usually start by getting the sauce cooking. Put all of the ingredients except the black pepper in a saucepan and stir to mix. Bring to the boil and simmer for about 25 minutes stirring occasionally so that it does not stick to the pan or burn. It could not be easier. Just adjust the simmering time depending upon how wet or thick you like your sauce; the thicker it gets the more intense the flavour.

Whilst the sauce is simmering you can make the pizza base.

Break the cauliflower up into florets and blitz until it has a couscous-like consistency (see the photo below). You can use the stalks too.


Now break the egg into the blitzed cauliflower and mix thoroughly.

Place some baking parchment on your baking tray of choice and then spread your pizza base mix evenly across it. There are no rules regarding how thick the base is. The thicker it is the more cauliflower taste there will be in the final pizza.


Now cook the pizza base until slightly golden. I usually do it at 200degC in a fan oven for about 10 to 15 minutes (or 180degC in a halogen oven). The aim of this stage is principally to dry out and firm up the base but it also imparts a gentle nutty flavour.

Once ready take the base out of the oven. Now add black pepper to the sauce to taste (I add quite a bit personally to add a bit of heat).

Spread the sauce over your pizza base and top with the basil leaves and mozzarella cubes.


Now put back in the oven and cook for a further 10 minutes. Then, hey presto! A beautiful, super-tasty, super-healthy pizza.

Suggestions for modifying this recipe:

  • Let’s face it, this is a pizza so I don’t really need to tell you that you can modify it by using the topping of your choice. Just keep it low calorie if you are on a low day.
  • Even if you are not on a low day the base is lovely so you can just top it with your usual dirty topping so that you can enjoy your usual pizza taste sensation whilst consuming less calories and more veg.
  • The sauce is also infinitely modifiable. You can leave out the olives and sundried tomato for a really basic, even lower calorie sauce. You could add flavourings of your choice. Just keep them low calorie if you are on a low day. Herbs, spices and roasted peppers are good for this.
  • If you can’t eat tomatoes then try blitzing roasted red, yellow and orange bell peppers. Lovely.

Beautiful halogen oven roast pork with veg

It is hard to beat beautifully roasted pork with crispy crackling and luscious apple sauce. It might not be suitable for a low day but this recipe is fantastic and the potatoes and carrots are at least roasted in a super healthy way.

I love roast pork but I have always found it hard to cook to perfection. I have always got it slightly wrong; always overcooking (and hence making it dry) for fear of undercooking and its potential for food poisoning. I have probably been worrying too much but you do hear that undercooked pork can be bad.

Anyway, another thing I love (and I am a bit sad that way 😃) is my halogen oven. They are wonderful things. They cook quickly and beautifully. I have had very many successes with my halogen oven including three Christmas turkeys now (another meat that used to always be dry when I tried roasting it until I did it in the halogen oven). However, I find it extremely hard to find reliable halogen oven roasting instructions for pork on the Internet.

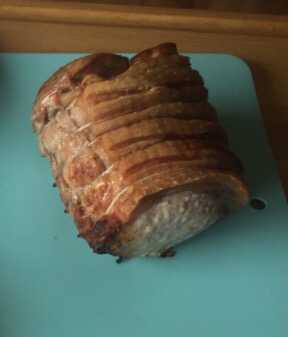
So, I have been experimenting with roasting pork in my halogen oven a couple of times (it’s amazing how you get inspired to create when your butcher offers rolled port joints for half price 😃) and I think I have found perfection. My pork was roasted beautifully. It was dead easy to do and the meat was moist and succulent. So I thought I should share it.

I served it with roast potatoes and carrots (cooked using one of my other favourite gadgets – my Actifry), some quick and easy cauliflower cheese and some home made apple sauce (well I actually used some toffee apple jam I had made – you can find the recipe here). Beautiful.

Okay, let’s start with the ingredients:

  • 1 rolled and tied pork joint (mine was about 2 1/2 pounds in weight.
  • Potatoes – as many or as few as you want.
  • Carrots – as many or as few as you want.
  • 15 ml Oil – I used rapeseed (canola) oil.
  • Cauliflower – I used about one third of a cauliflower for three portions.
  • 1 oz plain flour.
  • 1 oz butter.
  • 1/2 pint milk.
  • 100g mature cheddar (or any strong flavoured cheese).
  • Freshly ground black pepper.
  • Nutmeg.
  • Apple sauce and gravy (I used instant gravy mixed with the roasting juices) to serve.

And this is how to cooked it:

Start by resting your joint on a work surface so that it can get up to room temperature. This seems to help it cook much better than if it is refrigerated.

Now score the skin quite deeply but taking care not to cut the meat (otherwise it will dry out). Rub salt into the skin and massage into the scores. This will help to crisp up the crackling.

Heat your halogen oven to its maximum temperature (mine is 250 degC). Once up to temperature place your joint in on the low rack. Let it cook for about 10 minutes. It is this super-hot stage that leads to great crackling.

Then turn the temperature down to 175 degC and leave to cook for 35 minutes. At this stage I use a meat thermometer to check the internal temperature of the joint. If it has reached 68 degC then it is done otherwise put it back on for another five minutes before checking again (I did this three times before my joint was ready). Once it has reach 68 degC take the lid off the halogen oven and cover the meat lightly with foil or a tea towel and leave to rest whilst the veg cooks. That is it. Dead easy, right?

Three important points to remember are:

  • The internal temperature must reach 68 degC otherwise it will not be properly cooked.
  • Try to stop the cooking as soon as it reaches 68 degC. Every degree hotter means that the joint will be drier.
  • The joint must be rested. It ensures that the lovely juices stay in the meat, making it lovely and moist.

Perfect roast pork.


Now for the veg.

I prepared mine whilst the pork was cooking and then cooked the veg whilst the pork was resting as the 25 minutes roasting time for the veg is just about the perfect resting time for the pork.

Peel, chop, wash and dry (in that order) the potatoes and carrots.

Place them in your Actifry along with the oil. Of course you can roast them in a traditional oven if you wish but the Actifry is just so easy. If you do use traditional roasting then adjust your timings to suit your method.

Once you have started resting your pork turn on the Actifry and cook the potatoes and carrots for 25 minutes.


Chop your cauliflower into nice florets and place in a pan of salted water. Bring to the boil and simmer for about five minutes (adjust time based upon how firm you like you veg – I prefer mine on the firm, under-cooked side). Then drain and retain for later.

Now make a roux with the butter and flour (melt the butter in a pan and then add the flour, mix and cook gently for a couple of minutes)


Now gradually whisk in the milk and cook gently until it begins to simmer. By this stage it should be nice and thick. If it is too thick add a little more milk. Then add the black pepper and a sprinkling of grated nutmeg to taste (take care with nutmeg as it has an intense flavour that can overpower the taste if too much is added). Now add the grated cheese (adjust the amount based upon how cheesy you want it). Finally stir in your cauliflower and heat through. 

Now you have a really easy and absolutely lovely cauliflower cheese.

Okay, so now we are ready to plate up. Carve your joint into slices and serve with your veg, apple sauce and gravy. 


Absolutely gorgeous (and yes, I know my food photography skills need work😃).

Suggestions for modifying this meal:

  • The obvious modification is to serve it with different veg. You can use anything you like although I always think that veg with a bit of sweetness (e.g. carrots, parsnips, peas) works well with pork.
  • Use a mixture of strong flavoured cheeses (e.g. blue cheese, Parmesan, anything) in your cauliflower cheese.
  • Add some crispy bacon or pancetta to your cauliflower cheese.

One of my favourite recipes – Chinese steamed white fish with ginger, garlic and spring onions 


This meal is amazing. It is very easy, very quick and extremely tasty. And it is perfect for one of my low days at less than 400 calories.

Give it a try and let me know what you think. I love this meal.

Ingredients (for two people):

  • Skinless white fish (we tend to use one fillet of Vietnamese river cobbler per person as it is lovely and tasty AND very cheap – the photo above uses monkfish which is also lovely but a lot more expensive; just buy as much or as little as you fancy)
  • Ginger puree (you can blitz or grate root ginger or do what we do and buy tubes of ginger puree – quantity you need is down to your personal preference)
  • Garlic puree (you can crush garlic cloves or do what we do and buy tubes of garlic puree – quantity you need is down to your personal preference)
  • 2 spring onions / scallions quite thinly sliced at an angle 
  • 30ml soy sauce
  • 15ml toasted sesame oil
  • 80g rice ( I think white is best with this meal; we use basmati but any long grain will do)

Method:

  • Start to cook your rice (steam or boil).
  • Place your fish in a steamer. If using small fillets (e.g. river cobbler) you can leave them whole. If using monkfish tail then cut it into medallions first.
  • Spread garlic and ginger puree over the fish. We go for a thin covering across the upper surface of the fish but you can add more or less to taste. I find it works best if you have approximately equal quantities of ginger and garlic but there are no rules.
  • Steam your fish until cooked to your liking (in our cheap steamer this takes 7 or 8 minutes).
  • Whilst the fish is steaming mix the soy sauce and toasted sesame oil together and very gently heat.
  • Once cooked place your rice on the serving plates and place the fish next to the rice.
  • Give the soy sauce / toasted sesame oil mix a shake or stir so that it is mixed and spoon over the fish and rice.
  • Sprinkle the sliced Spring onions / scallions over and you are done.
  • Enjoy a beautiful, simple, healthy meal.

I am sure this will become a go-to meal. It is for us. We absolutely love it.

Suggestions for modifying this meal

  1. Make it mega healthy by replacing rice with cauliflower “rice”. Just blitz some cauliflower and lightly toast / roast it. This will reduce calories a lot and it is extra veg in your diet.
  2. Reduce calories by reducing the amount of soy sauce / toasted sesame oil mix. You do need some for flavour though. Personally I think the oil adds a beautiful depth of flavour but you could save 60 calories by just using the soy sauce.
  3. Try it with your favourite fish.

This is the Vietnamese river cobbler that we use…yum


I would love to know what you think.

Thanks for reading😃

Lose Weight the Dirty Diet Way


I found myself in a situation where I was heavier than I wanted to be but I could not motivate myself to do anything about it using any traditional diet or anything that had worked for me, albeit only ever temporarily, in the past. I had a number of issues…

  • My diet was pretty poor
  • I enjoy food and drink so damn much, I really believe it is one of life’s great pleasures
  • I was heavier than I had ever been and was beginning to look bigger than I was comfortable with
  • I have a job that requires long working hours and so I am usually tired all the time. I don’t know about you but when I am tired my will power to resist lovely dirty food and drink is almost non-existent

How was I meant to resolve all of these with a diet? I was at a bit of a loss for a while. All of the diets I was familiar with felt too rigid, too hard to maintain. I am a firm believer that you are much more likely to succeed with something like a diet if it is easy for you to do and, very importantly, easy to maintain in a manner that does not adversely impact the enjoyment of your life.

My wife suggested the Fast Diet. I looked into it and thought that the general philosophy was okay but, for me, trying to only consume 500 calories two days a week was just going way to far. Furthermore, the level of control required on the other five days meant that it would feel like you were dieting all the time…too much, too hard. However it did inspire me to develop my own diet that used some of the principles of the Fast Diet but in a way that would work for me. I call it The Dirty Diet because it does not stop you enjoying lovely dirty food and drink and even having blow out days.

Now I am not trying to claim here that no effort at all is required and yet you will lose weight. You do have to commit but I found this diet easy, really easy. So I thought I would share it. Have a look at the diet principles below, give it a try and see what you think. I would love to know if it works for you.

THE DIRTY DIET PRINCIPLES

There are two clear and distinct stages to The Dirty Diet; Losing Weight and Weight Maintenance.

Losing Weight

Losing weight is the shorter term part of the diet. It is the stage where you get down to your target weight. In essence, like every other successful diet on the planet, the key to this stage is to consume less calories than you burn. For me, it is impossible to lose weight any other way. The success (especially long term success) of all diets is heavily influenced by the method you have to employ to achieve the goal of burning more calories than you consume.

The principal benefit of The Dirty Diet is the ease of achieving this goal and the ease of getting your mind in the right place. It worked for me because it only ever felt like I was dieting for one day; on every single “dieting day” I always knew that I could eat normally tomorrow. For me that made the whole thing very easy. I only had to summon the my dieting will power for one day at a time. If I craved something lovely and dirty during a “dieting day” I knew I only had to wait until tomorrow until I could have it.

The very simple Losing Weight principles are:

  • 2 Low Days – you should have two days each week where you seriously restrict your calories – set your target as low as you think you can manage – I set a target of 1,000 calories – don’t change your target, keep it consistent
  • Dirty Days are Okay – enjoy your food and drink on the other five days – do not give yourself a hard time for enjoying a lovely dirty burger or even for having a blow out day (although not every day can be a blow out day of course)
  • Know How Many Calories You Consume – keep a detailed food / calorie diary – to make it easy I used a Fitbit; its smartphone app has a large database of foods and their calories
  • Know How Many Calories You Burn – again a Fitbit or similar is good for this, there are loads of free smartphone apps that will monitor steps and calories burned whilst doing exercise and whilst not
  • Balance Your Calories – it doesn’t matter what happens on any given day; the important thing to achieve here is for you to have burned more calories than you consume during each full week

It’s as simple as that!

For best results you should aim for the five non-low days  to have the same number of calories consumed as burned. I do not mean that every day should achieve this, rather you should consider the five days as a whole (i.e. the total calories consumed over the five non-low days and the total calories burned over these days). It is this principle that allows for dirty blow out days because you can always adjust.

If you can achieve calorie parity over the five non-low days then this will leave the 2 low days as the principal driving force behind the weight loss. However don’t give yourself a hard time if you don’t quite achieve calorie parity during the five non-low days; you will still lose weight if you burn more calories than you consume over the whole week.

How you achieve the balance is up to you; if you eat more you need to burn more . I often chose this option and burned more by walking the dogs and jogging on the spot to get my step count up.

Weight Maintenance

This is the long term aspect of The Dirty Diet. However, you should not really consider this stage as a diet; once you have lost your weight this stage should be a way of life.

The only real principle for this stage is to keep doing one or two low days per week in order to keep on top of your weight. Whether it is one or two depends upon how dirty the other days of the week are.

That is it. Easy right?

During this stage (which is just how I live my life now) I do two low days a week (target is still 1,000 calories in these days) because I like to eat and drink on the other days. I don’t even count calories consumed or burned anymore.

All I do is check my weight every few weeks. So far so good. However, if you find that you have been a little too dirty and your weight is creeping up again then no problem, simply go back to the Losing Weight stage for a while.

And remember…HOLIDAYS ARE OKAY. My advice is…do not try dieting on holiday, enjoy yourself and just tweak any weight gain back down using the Losing Weight stage for a few weeks.

I truly hope that this works for you. It has for me. I lost one stone in nine weeks and have been following the Weight Maintenance stage ever since. It really is easy.

In future posts I will share some of the recipes and strategies I used during both stages as well as reviewing some of the foods I have enjoyed eating.

I would love to know if The Dirty Diet has worked for you. I would also love to answer any of your queries re the diet.

Thanks for reading😀